• Home
  • Blog
  • About

Fresh From Oregon

Experience the Fresh Taste of Oregon...

  • award winning recipes
  • baking
    • bread
  • breakfast
  • canning
  • cast iron cooking
  • desserts
    • cake
    • candy
    • chocolate
    • cookies
    • pies
  • family favorites
  • fresh from oregon
    • farmers market
    • favorite products
    • hazelnuts
    • oregon made
    • pacific northwest trips
  • fruit
    • apples
    • berries
    • peaches
    • pears
  • holidays
    • easter
    • thanksgiving
  • lunch
  • main dishes
    • beef
    • chicken
    • pork
    • seafood
    • soup
    • turkey
  • side dish
    • pasta
    • salad
    • snack
  • vegetables
    • potatoes
    • tomatoes

Fresh Pumpkin vs can… you decide!

November 22, 2013 · by Carrie Trax ·

Blue Hubbard Squash & Pie PumpkinsThanksgiving is less than a week away and I am getting ready early for my holiday baking and cooking my fresh blue Hubbard squash and pie pumpkins.   I have been using fresh blue Hubbard squash or pie pumpkins to make my Thanksgiving pieHubbard Squashblue Hubbard Squash2013.11.03@20.05.48._K5I85252013.11.03@20.48.10._K5I8552 
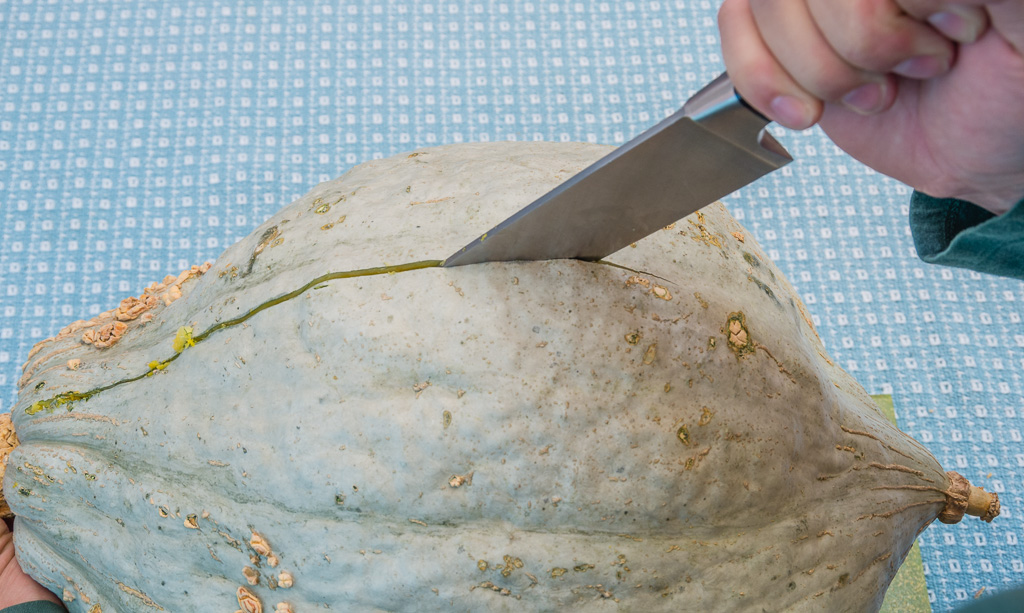
for over 20 years.  Marrying into a farm family helped me understand all the uses for fresh winter squash.  The fresh taste you get from baking your own you will make you never open a can again.  Both the blue Hubbard squash and pie pumpkin can be found at your local farm stand or farmers market.  I bought my blue Hubbard squash a month ago during the fall harvest season at Kiyokawa Family Orchard and Farm Stand in Hood River, Oregon.  The blue Hubbard squash may look like it came from another planet but this light blue and odd shaped squash has been used for a long time.  I can picture the covered wagons heading west to Oregon with blue Hubbard squash in back.  With its hard and thick shell they can keep for many months.  I got a few extra Hubbard squash and stored them in my cool garage to use later during the winter months.

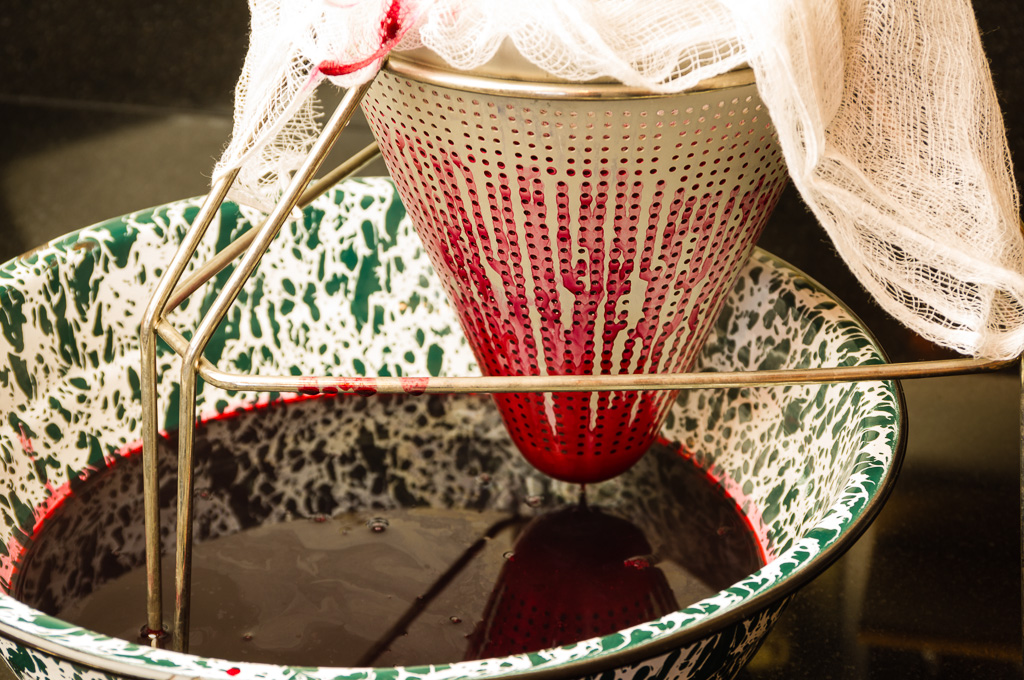
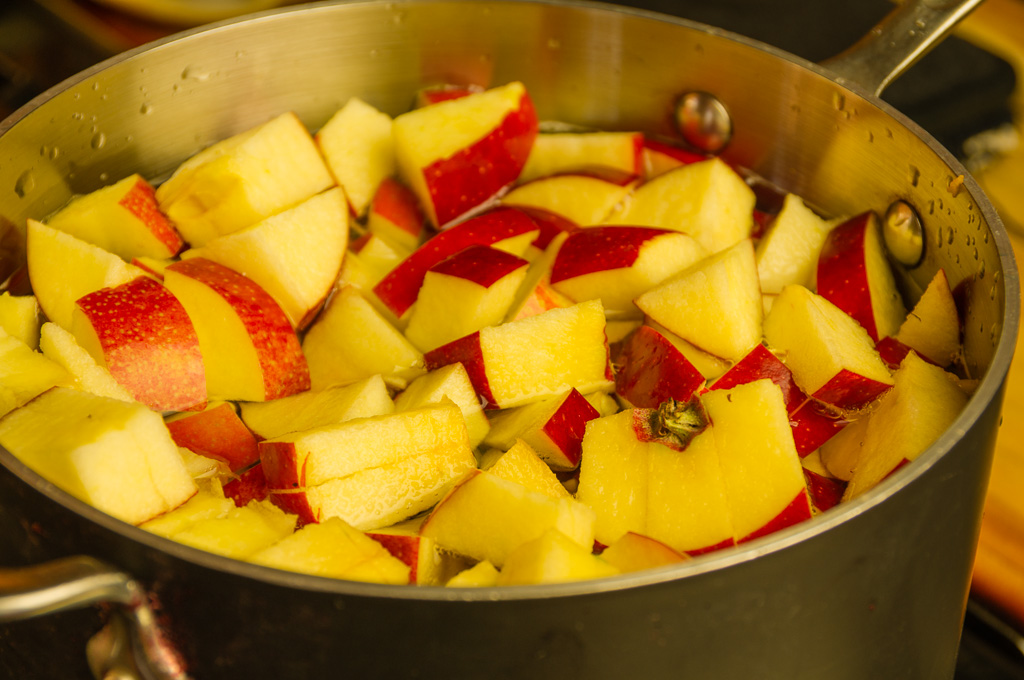
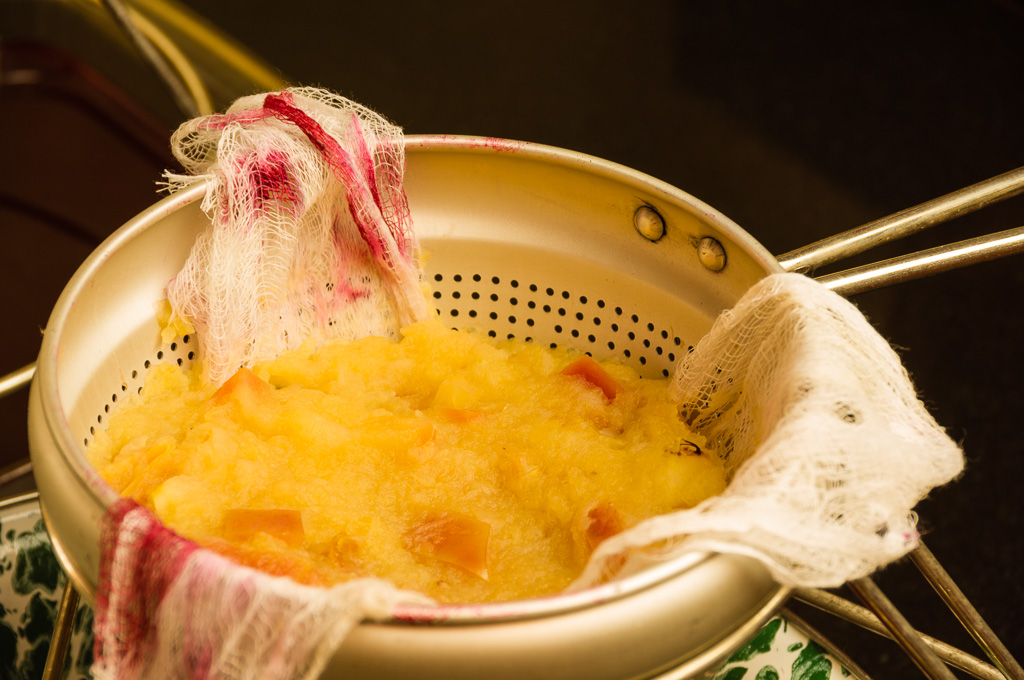
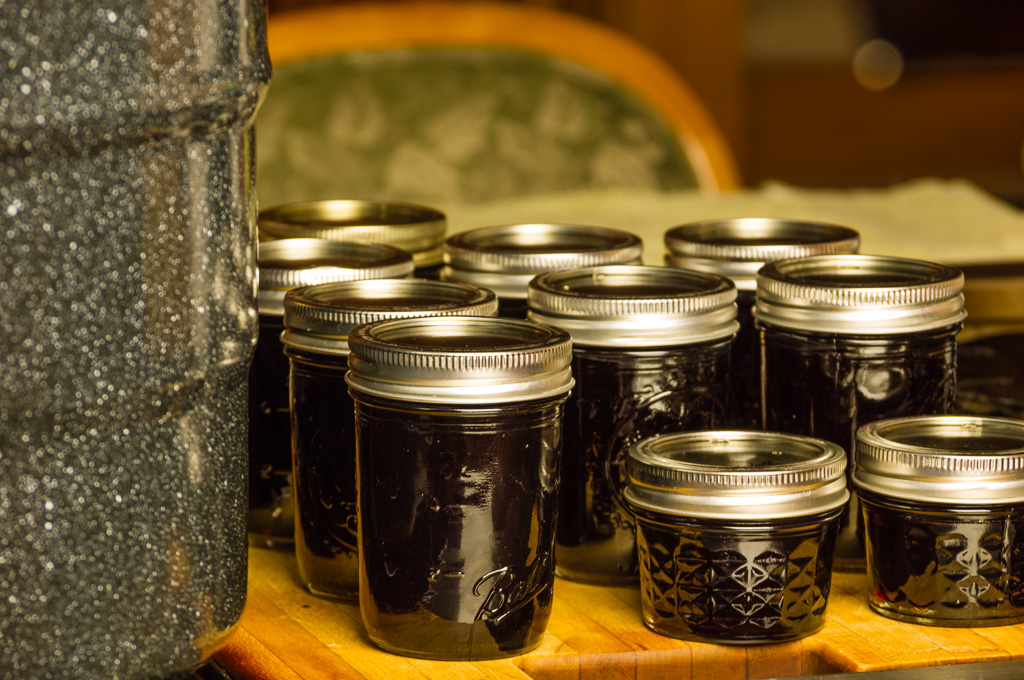
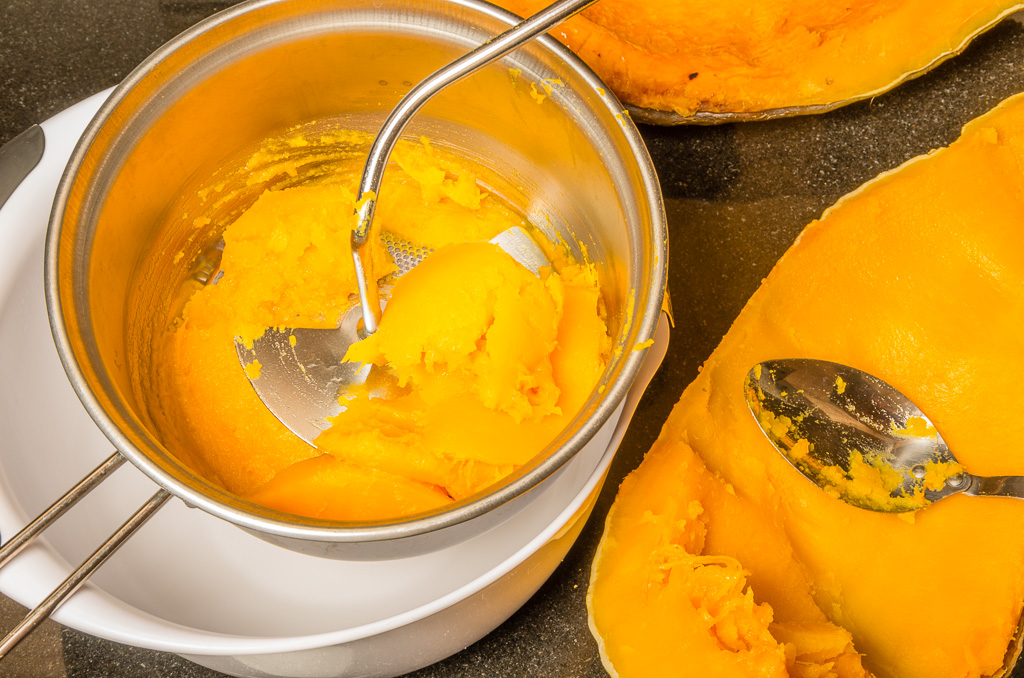
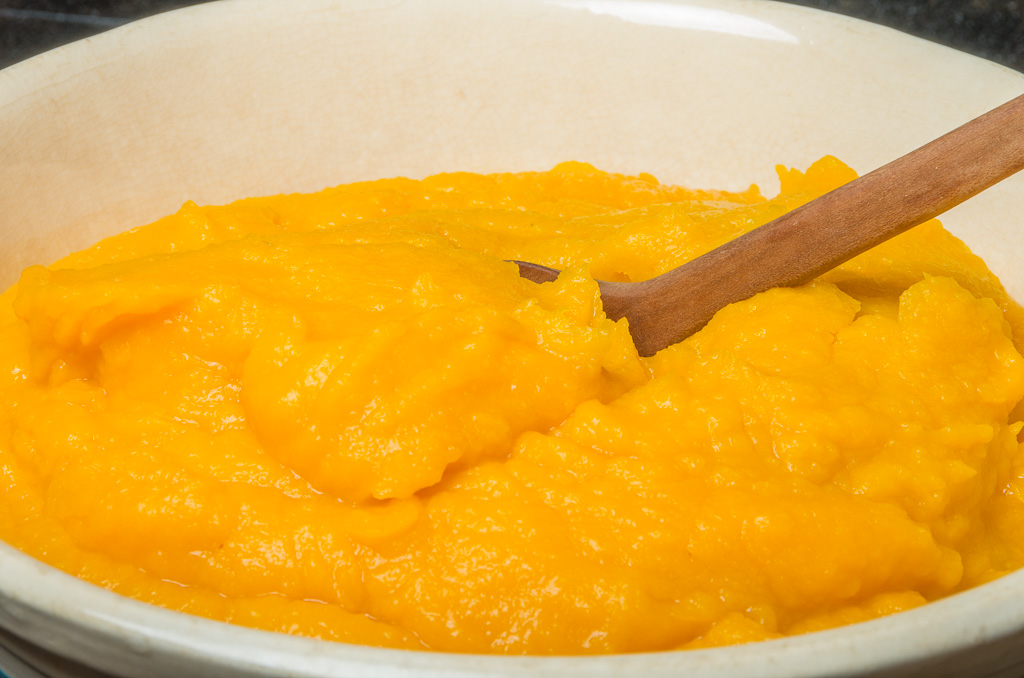
To prepare the Hubbard squash or pie pumpkin cut in half and scoop out the seeds and as much fiber as you can.  Do not throw away the seeds you can roast them later.  Place upside down on a rimmed baking sheet and place into a 350 degree oven.  Pour 1 cup of water in the pan, this we help steam the squash or pumpkin.  Bake for at least 1 hour or until it is soft.  I stick a knife into the shell and if it comes out with ease it is ready.  Take out of the oven and flip them over, let cool for 30 minutes.  With a food mill placed over a bowl scoop spoonfuls of the squash or pumpkin in and turn the handle to push the squash or pumpkin through.  You will get a nice smooth puree in your bowl.  Using a food mill helps to collect any fiber or seeds you may have missed when preparing the squash or pumpkin.  The general rule for the amount you will need for a pie is 1 cup of the pumpkin puree to make one pie.  I like to have the puree ready any time I need it so I cook a lot at one time and place 2 cups in a freezer container.  You can keep in the freezer for up to a year.  So any time you want to make muffins, pies, pumpkin rolls, soup or any other dish you can think of you can pull from the freezer, thaw and you have fresh puree.2013.11.03@21.20.15._K5I8555

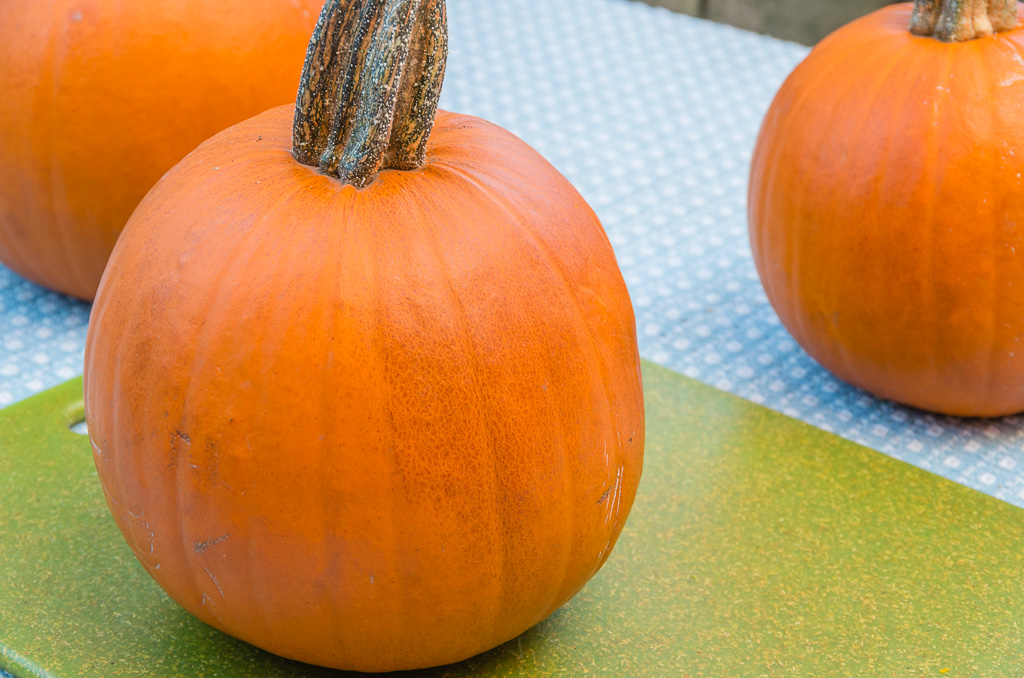
So what is the difference between using a Hubbard squash or a pie pumpkin?  Both have a great fresh taste but I tend to use the blue Hubbard squash first over a pie pumpkin.  The taste of a blue Hubbard in a pie has a richer flavor and it is lighter in color.  The hard shell of the blue Hubbard helps them keep for long periods in storage vs the pie pumpkin which has a thinner shell.  But the blue Hubbard squash is harder to find than the pie pumpkin and a lot harder to cut up.  If using a pie pumpkin I always look for the ones with the most brown speckled spots.

Hubbard Squash2013.11.03@14.01.11._K5I8477Check tomorrows post for recipe and how to make a homemade pumpkin pie and do not throw away your seeds I will have recipes for them too!

Filed Under: baking, farmers market, pies, soup, Thanksgiving · Tagged: baking, blue hubbard squash, pie pumpkin, pies

Fresh Pear & Gingerbread Crisp

November 17, 2013 · by Carrie Trax ·

2013.11.02@08.44.16._K5I8102Pear & Cranberry CrispPears are still in season Fresh From Oregon.  We take a few trips every fall over the mountain to Hood River, Oregon where you can buy pears fresh from the orchards.  There are many great places to shop but my favorite place is Kiyokawa Family Orchard & Fruit Stand.  If you do not live close to Hood River or are out of state just ask where you shop for Hood River Pears.  In this crisp recipe I used the Red Bartlett pear which holds its shape and flavor great during baking.  There are always two parts to a crisp, the juicy fruit bottom and the crunchy top.  I received a bag of Nature’s Path Organic Gingerbread Granola at the IFBC I attended this year and thought what a great flavor combination for my crisp gingerbread and pears.   The best thing about using this bag of granola from Nature’s Path is it all ready to use just add butter and you have a topping for any dessert.  They have so many flavors of the Love Crunch granola like Apple Crunch, Dark Chocolate & Berries, and Aloha Blend, check out all their other great and unique flavors.  The list of dessert creations you can make with Nature’s Path Love Crunch Granola is endless!

Topping:Granola in food processorPears & Dried CranberriesPears & Dried Cranberries CrispPear & Cranberry Crisp
2 1/2 cups Nature’s Path Love Crunch Organic Gingerbread Granola
4 tablespoons butter, cold

For the filling:
4 large Oregon Hood River pears, peeled and chopped
1/4 cup dried cranberries
1 tablespoon lemon juice
2 tablespoon sugar
1/4 teaspoon ground cinnamon
1/4 crystallized ginger, finely chopped

Preheat oven to 375 F.  Spray 8 small ramekins lightly with baking spray, set aside.

Place the Nature’s Path Organic Gingerbread Granola in a food processor and pulse a few times.  Add butter and pulse until topping resembles coarse meal, set aside.

Combine Oregon Hood River pears and dried cranberries in a large bowl.  Add lemon juice, sugar, cinnamon and crystallized ginger.  Divide mixture evenly between the 8 individual ramekins.  Cover evenly with the Nature’s Path Organic Gingerbread Granola topping.  Place on baking sheet and bake in oven until topping is golden brown and fruit is bubbling, about 30-40 minutes.Red Bartlett pears on the tree

Filed Under: baking, desserts, farmers market, favorite products, fruit, Pacific Northwest Trips, pears · Tagged: dried cranberries, gingerbread, Hood River, Kiyokawa Family Orchard, Nature's Path Organic Love Crunch Granola, pears

Chocolate Cake and Baking from my home to yours … Dorie Greenspan

September 30, 2013 · by Carrie Trax ·

Chocolate Cake Baking with Dorie GreenspanIt has been just over a week since coming home from Seattle and my first IFBC (International Food Bloggers Convention).  Signing up over 6 months ago I was so excited to meet other food bloggers and hear what they do to have a successful blog.  As the day drew near to drive the 4 hours to Seattle I started to get very nervous.  I am going to be in a room with 320 people and I was going to not know one person.  We arrived at the W Hotel just before noon and the lobby is crowded with people talking and hugging each other and I knew this was a friendly group but still was not sure how I was going to fit in.  After checking in and getting to our room (my husband came along to support me and get some extra sleep) he said it was time to meet everyone and he pushed me out the door.  After getting my badge I just walked around seeing groups of people talking and laughing and I thought “how do I meet you”.  As I was standing down the hall from the Chipotle Mexican Grill lunch I heard a voice “are you here by yourself” and she said so I am, I have met my first food blogger.  After we exchange who we are and what we blogged2013.09.28@20.09.25._IGP6617 about we parted ways and went to get a seat to hear the Keynote speaker, Dorie Greenspan.  As I sat around the table with some more new faces we exchanged business cards and shared with each other, now I have 5 more food blogger friends.  As Dorie takes the stage and she starts to talk in her soft voice I started to feel more at ease and just in awe of the life she has had and author of 11 cookbooks.  As she walks off the stage with a round of overwhelming applause I felt that there was nothing to keep me back from creating my own dream to be the best food blogger I can and maybe one day I could have a cookbook.   I was so excited and we had a small break before the afternoon session started so I raced back to my room to share with my husband the most inspiring woman I just heard talk and then DASHED out of the room to learn more.   The rest of the day was amazing and I wished it would not end but I knew the next day would be filled with more new faces and lots more to learn.  I did send my husband on an errand Saturday morning, 8 blocks to the Barnes and Noble book store to get me a copy of Dorie’s “Baking: From My House to Yours”.  Hoping to see Dorie and get her to sign it I carried the book all day and if you do not have a copy the book weighs almost 5 pounds.  I lost all hope at the end of the day without seeing her and thought see must have left until I saw a tweet from her about the Urbanspoon Surprise Saturday Supper she was at.  The next morning I sent Dorie a tweet and within 10 minutes she tweeted I am leaving in 30 minutes but if you leave the book at the front desk I will sign it before I leave.  Leaving the book at the front desk I went to the morning class “Writing – Snap out of it” presented by author/journalist Kim O’Donnel.  Waiting 30 minutes I slip out of class quietly and went back to the front desk to find Dorie had signed my book, a treasure I carried with me back to my seat.  The conference would be ending soon and I 2013.09.28@20.11.21._IGP6622felt I was leaving a more confident person and had made many new friends.  Next year I want to be the person that walks up to the person standing by themselves and welcomes them into the group like I was the first day.  I knew I wanted to do my first blog post on Dorie and I thought what better way but to make a recipe from her cookbook “Baking: From My House to Yours”.  I created the chocolate cake with marshmallow icing on the front cover and since I got some great swag the first day I used the Scharffen Berger bittersweet chocolate bar and the lagrima vanilla extract in my recipe.   I also used some of the photography tips we learned from Andrew Scrivani when taking these pictures.  The swag  bag is getting a little lighter this week with more recipes I am making with the great products we received … watch for what I will be creating next.  Happy Blogging to all and thank you for welcoming me!

2013.09.28@16.23.35._IGP6588

Filed Under: baking, cake · Tagged: baking, cake, Chocolate, Dorie Greenspan, food blogging, Seattle

French “Candy” Onion Soup

September 16, 2013 · by Carrie Trax ·

Sliced onions and butter

Why did I get so excited when I found these yellow onions last week?  These are not just any yellow onions they are “Candy Pot of carmalized onionSwiss Cheese with toasted breadBowls of French Onion Soup with toasted bread and swiss cheeseOnions” I got at the Beaverton farmer’s market here in Oregon.  These onions are high in sugar content and caramelize into a rich brown color making them perfect for French onion soup.  You can also cut them in 1/2″ slices, brush with some olive oil and place on medium-high heat on your grill.  These onions will grill up beautifully and are a perfect topper for your next burger or pizza.  I got these onions Fresh From Oregon but they are found all across the country.  If you can get your hands on some gather them up and try some of these sweet onions for yourself.

French “Candy” Onion Soup
6 large “Candy” onions, thinly sliced
3/4 cup butter
1 1/2 Tablespoon flour
16 oz. chicken broth
16 oz. beef broth
3 cups water
1/2 teaspoon pepper
Loaf French bread
12 slices Swiss cheese

Saute onions in butter until caramelized.  This is really important to get the best flavor.  I saute for 45 minutes to a hour.  Sprinkle flour over onions and stir until smooth.  Gradually add the chicken and beef broth, water and pepper.  Bring to a boil, reduce heat and simmer for 30 minutes.
Slice bread in 1/2 inch slices and brush with olive oil and toast both sides.  Once soup is ready ladle about 2 cups into a bowl and place 1 or 2 pieces of toast on top and then add 2 slices of Swiss cheese.  Place under the broiler until the cheese is brown and bubbly.

French Onion Soup

Filed Under: family favorites, farmers market, lunch, soup, vegetables · Tagged: Best French onion soup, broth, candy onions, dinner, French onion, lunch, onions, soup

Mint Lime Mojito Jelly

September 4, 2013 · by Carrie Trax ·

Mojito Lime Jelly

Fresh from Oregon means fresh from my own garden.  I planted a big barrel of Mojito mint and it is ready to harvest.  So what to make with all this mint … Fresh From Oregon Mint Mojito Jelly.  This is great served as a condiment with pork or lamb but I like to just spoon it over a block of cream cheese and serve it with crackers.  Great recipe to preserve the Fresh From Oregon taste you can enjoy throughout the whole year.  It also makes a quick and easy treat for unexpected guest who stop by, enjoy!

Mint Mojito Jelly
2 cups fresh mints leavesmint
8 cups water
1 box powdered pectin
4 cups white sugar
1 cup fresh lime juice

Bruise mint leaves a bit with a fork or by twisting.  Add to the water in a saucepan.  Boil over high heat until reduced by half to 4 cups of liquid.  Strain and discard the leaves.  To the water add the box of powdered pectin and stir until dissolved.  Add the sugar and fresh lime juice.  Bring to a boil.  Boil for one minute, stirring constantly.  Remove from heat and skim foam of the top if any.  I add a few drops of green food coloring to make it a little more greener.  Ladle into sterilized jars and process for 10 minutes in a hot water canner.

Recipe from ~ Crafty Staci

Filed Under: Award winning recipes, canning · Tagged: herb, jelly, lamb, mint, mojito

Blue Ribbon Vanilla Peach Pie with Hazelnut Crust

August 21, 2013 · by Carrie Trax ·

Peach Vanilla Peach Pie

The Red Haven peaches are ripe and Fresh from Oregon and just in time for me to use in my peach pie.  This was a special pie I baked for the 2013 Clackamas County Fair this past Sunday.  The slices of fresh peaches mixed with vanilla extract and baked in this melt in your mouth hazelnut pie crust got me a blue ribbon.  A big thanks to Pilgrim Orchard for sponsoring the contest this year.  My favorite Red Haven peaches are now ready so pick some up at your local farm stand or farmers market and bake a blue ribbon peach pie!

Blue Ribbon Vanilla Peach Pie with Hazelnut Crust

Hazelnut pie crust ~ recipe below

8 cups fresh peaches, peeled & slicedBlue Ribbon
2 cups sugar
4 Tablespoons Bob Red Mill flour
½ teaspoon cinnamon
1 teaspoon vanilla
1/3 cup butter

Preheat oven to 425 degrees. In large pot combine the peaches, sugar, flour and cinnamon, set aside until syrup forms. Bring the peach mixture to a boil; reduce heat to low and cook 10 minutes or until peaches are tender. Remove from heat and add the vanilla and butter, stirring until butter melts.

Pour into prepared pie crust. Roll out second dough and with a mini leaf cookie cutter cut shapes from dough. Start from the outer edge of the pie and work into the center laying down the leaves in a circular pattern.

Bake at 425 degrees for 10 minutes, reduce heat to 350 degrees and bake another 30 minutes or until crust is a golden brown and the juice is bubbling from the pie. Remove from oven and cool on wire rack at least 1 hour.

Hazelnut Pie crust
3 cups Bob Red Mill flour
1/2 cup Toasted Oregon Hazelnuts, ground
1 tsp salt
1 ¼ cups shortening
1 egg
1 Tbsp cider vinegar
5 Tbsp cold water

In large bowl combine the flour, hazelnuts and salt. Add shortening and cut into flour until it resembles coarse meal. In small bowl combine the egg, vinegar, and water. Add and quickly mix into mixture until combined. Divide dough in half and wrap in plastic, refrigerate for 30 minutes.

Roll out the 1st piece of dough to fit a 9”pie plate, roll the dough under and crimp the edges, set aside. The second piece of dough will be used to cut out leaf shapes for the top of the pie.

Save

Save

Filed Under: Award winning recipes, baking, desserts, farmers market, fruit, hazelnuts · Tagged: award winning, blue ribbon, hazelnuts, Peaches, pie, vanilla

“Fresh from Oregon” Summer Canning

August 18, 2013 · by Carrie Trax ·

Canning Shelf With all the Fresh from Oregon produce coming in I have been busy preserving that fresh taste. I have filled my pantry to have that Fresh from Oregon taste all winter long. Jars of Pie Filling And I have been doing my favorite thing of the year, entering the local county fair.   Each Saturday for the past 4 weeks I have been going to the farmer’s markets which are just overflowing with fresh produce.  I then spend the next few days turning all that fresh produce into works of art.  I have pickled beans, asparagus, carrots, peppers and beets.  I turned little pickling cucumbers into Bread & Butter pickles, sweet slicers and garlic dills.  I have made Fresh from Oregon fruits like peaches, blueberries and cherries into pie filling.  Colorful jars of peaches, pears, fruit cocktail, blueberries and cherries line my shelves.  I have jars with diced tomatoes and tomato sauce that are waiting for me to open during that winter snow storm and become that big pot of chili.  No pantry would be complete without jars of jellies, jams and conserves.  My family enjoys this fresh from Oregon taste all year long and I enjoy giving jars as gifts to family and friends.   August and September are two great months to preserve the summer harvest for you to enjoy when things are not fresh in season.   I will be sharing some of my easy and favorite canned good recipes in the upcoming weeks.

Grandma’s Garlic Dill Pickles2013.08.17@12.04.52._IGP3491

11 cups water
5 cups white vinegar
1 cup canning salt
12 pounds pickling cucumbers, quartered, halved or left whole
9 dill sprigs
18 garlic cloves
18 dried hot chilies
In a stockpot bring water, vinegar and salt to a boil; boil for 10 minutes.  Pack pickling cucumbers in pint or quart jars to within 1/2″ to top.  Place one dill head, two garlic cloves and two peppers in each jar.

Carefully ladle hot mixture over cucumbers in the jar leaving 1/2 inch headspace.  Remove any air bubbles, wipe rim and place on a lid and ring and finger tight.  Process for 15 minutes in a boiling-water canner.  Remove from canner and sit on a towel for 24 hours.  To check to see if they are sealed press the ring and if you hear no click they are ready to place on your shelf.  To get the best flavor do not open for at least 6 weeks.  Store in a cool place and do not store in direct light.  If you have any jars that did not seal place in your refrigerator and enjoy in six weeks.  I learned to can by reading the Ball Blue book and would recommend it for any beginner canner.

Jars of pickled vegetablesPicklingPickled Peppers in a jar

Homemade Dill Pickles

My Fresh from Oregon Pantry of vegetables and fruits!

Canning Shelf

Filed Under: Award winning recipes, berries, canning, family favorites, farmers market, fruit, peaches, tomatoes, vegetables · Tagged: Canning, pickling, pie filling, preserving

Fresh Blackberry Apple Jelly

July 19, 2013 · by Carrie Trax ·

Blackberry Apple JellyIf the word homemade jelly makes you think wow that’s a lot of work and looks so hard to do I am here to change your mind.  I have been making my own jam for 30 years and I always thought jelly was a lot of work until I decided I was going to give it a try last year.  At first I went to the store and bought a jelly strainer with the washable cheesecloth and started to make my first batch.  It was easy to take the fruit, add some water and let it cook down for about 5 minutes.  So with my cheesecloth lined strainer I added my fruit and juices only to discover the store bought metal strainer was not as sturdy as I thought and the cheesecloth did not hold all my cooked down fruit.  I did eventually get all the juice into a bowl and made my first jelly but I needed a better way to strain my juice from the fruit.   One Saturday morning my husband and I went to an  estate sale and there in front of my eyes was a vintage jelly strainer.  For $5 I could not pass it up and had to give it a try.   After making my first batch of jelly in this vintage jelly strainer I was hooked.  I have found 2 more since at estate sales and sometimes I have 3 different batches of jelly going at one time.  With blackberries Fresh From Oregon this week it was time for me to make a batch of blackberry apply jelly.  So if you have been thinking about making homemade jelly just hit a few estate sales and come home with your own vintage strainer and get started.

Fresh Blackberry Apple Jelly
3 pounds blackberries (2 1/2 quarts)Blackberry juiceCut apples in pot2013.06.29@17.10.32._IGP0706
1 1/4 cup water
8 medium apples
Bottled apple juice (maybe)
1/4 cup lemon juice
8 cups sugar
2 pouches (3oz each) liquid fruit pectin

In large sauce pan, bring blackberries and 1 1/4 cup water to a boil.  Reduce heat and simmer for 5 minutes.  Line a stainer with a double layer of cheesecloth and place over a bowl.  Place berry mixture in strainer and let stand for 30 minutes or until you think all the juice has strained out.  Reserve the juice and discard the pulp.

Remove and discard the stem and blossom ends of the apples (do not peel or core), cut into small pieces.  Place in large saucepan with just enough water to cover.  Bring to a boil.  Reduce heat and simmer for 20 minutes or until apples are tender.  Place apples in cheesecloth lined strainer and leave for 30 minutes.  Reserve juice and discard pulp.

Measure the reserved blackberry and apple juice to 4 cups each.  If necessary, add bottled apple juice to get to the 4 cups.  Stir in lemon juice and sugar and mix until sugar is dissolved.  Bring to a full rolling boil, stirring constantly.  Stir in the two packets of liquid pectin; return to a full rolling boil.  Boil for 1 minute, stirring constantly.

Remove from heat; skim off foam.  Ladle into hot jars, leaving a 1/4-inch headspace.  Wipe the rims of the jar and adjust the two-piece cap.  Process 10 minutes in a boiling water bath.  Remove jars from canner and set on a towel to cool.

Source ~ Taste of Home Canning & Preserving magazine

2013.06.29@20.29.17._IGP0715

Filed Under: apples, berries, canning, farmers market, fruit · Tagged: apples, berries, blackberries, Canning, jelly

Homemade Apricot Jam

July 15, 2013 · by Carrie Trax ·

Jars of Apricot JamFresh apricots can be found in our local farmers markets this week in Oregon.   This small orange golf ball size fruit is perfect eaten fresh or if you want that delicious flavor all year it makes some of the best jam.  You only need a few ingredient to turn this Fresh From Oregon fruit into a sweet jam you can enjoy throughout the year.  My husband enjoys this apricot jam on his toast but it can be added to so many other things.  It is perfect for using as a filling in your cookies like thumbprints, and apricot bars.  You can even heat apricot jam in a small saucepan and use as a glaze for grilled chicken and salmon.  So add this to your canning list this year and see what you can use it for and please share in the comments below.

Homemade Apricot Jam
8 cups apricots, crushedFresh cut apricotsApricot Jam
1/4 cup lemon juice
1 box powdered pectin
6 cups sugar

To crush the apricots cut them into small pieces and with a potato masher crush into small pieces.  I find it easier to place in a food processor on pulse only to get the small size pieces I need.   Place the crushed apricots, lemon juice and powdered pectin into a large pot.  Stir until the pectin is mixed in thoroughly.  Bring to a gentle boil, add the sugar all at once.  Stir for at least 2 minutes to make sure all the sugar is mixed in.  Bring the mix back to a boil that can not be stirred down and boil for 1 minute.  Remove from heat and skim off any foam from the surface.  Ladle hot jam into hot jars, leaving 1/4-inch headspace.  Adjust two-piece cap and process for 15 minutes in a boiling water bath.  Remove and sit on a towel to cool.

Source ~ Ball Complete Book of Home Preserving

Apricot Jam

Filed Under: canning, farmers market, fruit · Tagged: apricot jam, apricots, Canning, fruit, jam, jars

Mini Oregon Berry Pies

July 4, 2013 · by Carrie Trax ·

blackberry, Blueberry, Tayberry & Strawberries in a wooden crateYou know that summer has started here in Oregon when you see the boxes of berries overflowing at the farmers markets.  Blackberries, Blueberries, Tayberries are in season with a few Strawberries still around.  After gathering up several boxes of each of these berries I needed to find a way to enjoy all these berries in one day.  Mini pies are a great way to make small size treats so that you can sample several different flavors without a lot of baking.  Blackberries and blueberries are both mixed with lemon zest and a dash of cinnamon to bring out their fresh berry taste.  For the strawberries I mixed them with fresh chopped rhubarb and the tayberries are so sweet just a little sugar brings out their delicious flavor!  The last thing on any pie is the topping.  I made one each of the blackberry and tayberry with a traditional double crust.  To show off the blueberries a lattice top was the best choice.  Crumb top was a must for the strawberry rhubarb pie and the remaining berry’s pies.  Enjoy the recipes below and make a Fresh From Oregon berry pie this summer.  The recipes below will make 6 mini pies.  If you want to make a full size of any of these pies below just triple the amounts of the filling and its perfect for a full size pie.

My favorite and only Pie CrustBlackberry, Blueberry, Tayberry & Strawberry Rhubarb mini Pies
3 cups flour
1 teaspoon salt
1 1/4 cups shortening
1 egg
1 tablespoon cider vinegar
5 tablespoons cold water

In a large bowl mix flour and salt, add shortening and with a pastry blender mix just until the shortening is mixed and the dough is the size of small peas.  In small bowl  beat egg, vinegar and water with a fork, add to dough and mix until the dough just comes together (Do not over mix or the dough will be tough).  Divide dough into three pieces and flatten slightly, wrap in plastic wrap and refrigerate for at least 30 minutes.  Once slightly chilled divide each dough into 3 pieces.  Roll out 6 pieces on a lightly floured surface and place into 6 mini pie pans. Roll out the remaining 3 pieces slightly bigger than the pie pan and set aside until ready to top one on the blackberry, tayberry and blueberry pies.

Crumb Topping
In medium size bowl mix 1/4 cup + 1 tablespoon sugar, 1/2 cup + 2 tablespoon flour and 1/4 cup of room temperature butter.  Mix until you get small crumbs, set aside.

Blackberry Pie ~ 2 mini piesblackberry, Blueberry, Tayberry & Strawberry Rhubarb mini Pies
2 1/2 cups blackberries
1/4 to 1/2 cup sugar (depending on how sweet they are)
1/2 teaspoon lemon juice
1/2 teaspoon lemon zest
1/4 teaspoon cinnamon
1 1/2 tablespoons instant tapioca (These helps to thicken the juices)
1 tablespoon butter, cut in small pieces

Preheat oven to 425 degrees.
Place blackberries, sugar, lemon juice & zest, cinnamon and tapioca in a large bowl and toss gently to mix. Let set for 30 minutes.  In one pie crust add 1/2 the pie mix place 1/2 tablespoon butter over berries and place one of the rolled out pie crusts on top.  Roll edges under the bottom pie crust and crimp the edge.  Cut a couple of slits in the top crust or use a decorative mini cookie cutter pressed in the top to create a vent for the pie.  In the second pie crust add remaining berries and top with 1/3 of the crumb topping.  Place on baking sheet.

Tayberry Pie ~ 2 mini pies
Follow the recipe above for the blackerry pie reducing the sugar to 1/8 cup and omitting the cinnamon.

Blueberry Pie ~ 1 mini pie2013.06.23@11.22.44._IGP0560
1 1/2 cups blueberries
1/8 teaspoon lemon zest
1 teaspoon lemon juice
1 tablespoon flour
2 tablespoons sugar
dash cinnamon
1/2 tablespoon butter, cut in small pieces

In small bowl combine blueberries, lemon zest & juice, flour, sugar and cinnamon.  Place in one of the prepared pie crusts and top with the butter.  Roll the edge of the pie crust under and crimp the edge.  With the last rolled out pie crust cut strips of dough about 1/2″ wide and place on top of the blueberries in a lattice pattern.  Place on baking sheet.

Strawberry Rhubarb Pie ~ 1 mini pieStrawberry Rhubarb Crumb Top Pie
1 cup rhubarb, chopped in small pieces
1 cup strawberries, de-stemmed and cut in half
2/3 cup sugar
1 tablespoon instant tapioca
1/2 tablespoon flour
1/4 teaspoon lemon zest
1/4 teaspoon lemon juice
1/2 tablespoon butter, cut in small pieces

In small bowl mix rhubarb, strawberries, sugar, tapioca, flour, lemon zest and juice and toss to combine.  Place in remaining prepared pie crust top with butter and roll pie crust under and crimp the edge.  Top with the remaining crumb topping and place on baking sheet.

You are ready to bake your mini pies.  Bake at 425 degrees for 15 minutes, decrease temperature to 350 degrees and baking another 45  minutes or until the tops are a golden brown and juices are bubbling from the pies.  Remove from oven and cool on wire rack.

Baking homemade fresh fruit pies

Filed Under: baking, berries, desserts, farmers market, fruit, pies, Uncategorized · Tagged: baking berries, blackberries, blueberries, chopped rhubarb, dessert, pie, rhubarb, strawberry, strawberry rhubarb pie, tayberry

  • « Previous Page
  • 1
  • …
  • 6
  • 7
  • 8
  • 9
  • 10
  • …
  • 15
  • Next Page »

Fresh From Oregon!

Welcome to Fresh From Oregon! Read More…

Subscribe to Blog via Email

Enter your email address to subscribe to this blog and receive notifications of new posts by email.

Join 37 other subscribers

Connect With Me

  • Email
  • Facebook
  • Flickr
  • Google+
  • Instagram
  • Pinterest
  • Twitter

Featured Posts

Three Best Apples for Baking this Week in Oregon

Three Best Apples for Baking this Week in Oregon

Each week new apples are being picked in Oregon and these are the three best apples for baking with this week.  That list changes as we move through the season with varieties getting too ripe for good baking and new ones being picked. Honeycrisp – It is a medium to large apple with a white […]

Pears, Blue Cheese and Hazelnuts do I need to say any more?

Pears, Blue Cheese and Hazelnuts do I need to say any more?

Here is another recipe I adapted from the Cook to Books January challenge from  Around My French Table by Dorie Greenspan.  The original recipe was a Gorgonzola-Apple Quiche and to make it a Fresh From Oregon taste I made it with pears and an Oregon blue cheese and added hazelnuts to the crust.   I […]

Bob’s Red Mill Bread Contest ~ Swirled Pumpkin Bread

Bob’s Red Mill Bread Contest ~ Swirled Pumpkin Bread

It has been a great year for me this year at the 2014 Clackamas County Fair in Canby, Oregon.  I won 120 ribbons and was named “Queen of the Kitchen” and “Queen of the Fair”.  One of the best awards was winning the Bob’s Red Mill Bread Contest at the fair.  This pumpkin bread is […]

Spring in Finally here in Oregon

Spring in Finally here in Oregon

It has been a very rainy spring this year in Oregon, so with a peek of blue skies today I headed to the Beaverton Winter Market.  I live in the foothills of Mt Hood and this is a little over an hour drive for me but I just had to see what was Fresh from […]

Recent Posts

  • Washington Asparagus Fresh at your local Market Now!
  • Asparagus Salad with Lemon Vinaigrette
  • Fresh from Oregon heads to California
  • Summer Corn & Crab Chowder
  • Fresh Asparagus with Eggs Benedict
  • The Best Way to Store Asparagus
  • Roasted Asparagus with Lemon Olive Oil
  • Spring in Finally here in Oregon
  • Simply Natural ~ Lindsay Olives
  • Capay Valley Ranches ~ California Olive Oil at its Best!
  • Over the Top Blueberry Muffins
  • Fresh Homemade Blueberry Sauce
  • The BEST Homemade Granola
  • Homemade Strawberry Lemon Jam
  • Strawberry Cheesecake in a Jar
  • Homemade Strawberry Sauce
  • Asparagus Caesar Salad
  • Fresh from the Oregon Coast ~ Cioppino for Two!
  • Pancake Hearts for Breakfast
  • Homemade Chicken Noodle Soup
  • Apricot Coffee Cake with Crumb Topping
  • The Great Food Blogger Cookie Swap 2015 ~ Christmas Swirl Sugar Cookies
  • Best Ever Homemade Pie Crust
  • Mini Apple Hand Pies are perfect for the Lunch Box!
  • What to do with all the Green Tomatoes … Fried Green Tomatoes
  • Bays English Muffins Pumpkin Pudding
  • Stonyfield Yogurt… Good Morning Parfait
  • Bays English Muffins perfect for your Lunch Box!
  • Dutch Apple Pie ~ Just the right bite!
  • Corn Relish … Summer in a Jar
  • Mixed Berry Bread Pudding
  • Fresh Oregon Berry Tart
  • The Hoods are here… Mini Strawberry Pretzel Pie
  • Strawberry Rhubarb Sauce
  • B “S” T Egg Salad Sandwich
  • Melt in your Mouth Reuben Sandwich

Archives

Meta

  • Log in
  • Entries feed
  • Comments feed
  • WordPress.org

Experience fresh food from Oregon!

Recipe Master: Carrie Trax Editor: John Trax
Photographer: John Trax

Categories

Copyright 2014 Fresh From Oregon

Copyright © 2025 | Innovative by The Pixelista | Built on the Genesis Framework